
In the previous part we looked at what AREDN is and some of the facilities and services. In this part we will look at the node user interface. The user interface or Node Status screen will look like this:

This is the landing screen when you connect to a node.
At the top you can see the Node ID. It always starts with the call sign. That keeps the FCC happy and makes it easier to operate our network.
The next line is the location line this both allows the mapper to locate the node on the map but it also allows the node to make time corrections for the data flowing across the network. Remember that we are dealing with the speed of light here and at these speeds a long path can be impacted by the transit time so having the location data in the node is for much more than just finding it on a map. But there are some nodes without location data generally these are nodes that are mobile, in which case the location data will be empty and the network will try to calculate based on Round Trip time of the data flow.
Next follows additional node information on the gray background line. In this case Bill has the city name in that space, but you may put anything (legal) that fits in there.
Below that is a line of buttons which will take you to different screens on the node.
Next is the network information about this node. The local IP address, the mesh gateway, the LAN address the radio channel it is on and much more. We will not go into dept here, later on we will do a deep dive into all of this information. Also some of it will show up on the other screens which we shall look at.
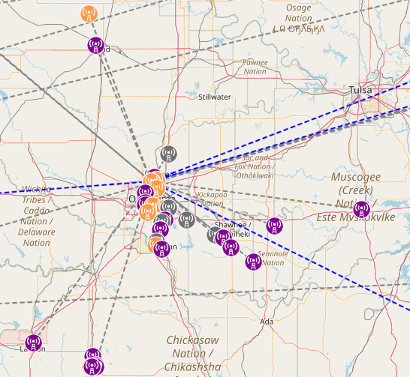
Back to the buttons the [Refresh] button does just that, no more. But the [Mesh Status] will show us all of the nodes on our local mesh, the present Oklahoma mesh has 66 nodes on it though that may vary from day to day but it is steadily increasing weekly.
Here is a partial page of the Mesh Status:

This page is actually about 3 pages long but I did not include all of it for space.
What we see here is the actual active nodes that Bill can connect to, there are even more that can be reached but more on that later.
Below the city name we see a set of buttons Help, [Refresh], [Auto], [Cloud Mesh] and Quit followed by a search bar.
Help is pretty well self explaining, it will take you to a page that gives you help on the screen information.
[Refresh] is just to refresh the screen.
[Auto] will cause the screen to refresh automatically.
[Cloud Mesh] will connect you to your local supernode, this is where you can reach out to nodes all over the planet. (of course they must be on the mesh network so they may be reached).
[Quit] takes you back to the Node Status screen. Search allows you to search for a call sign or service.
The search bar allows you to search the page.
Next is the Node Name which gives the node name as seen, moving right we see the LAN Host name, this just shows what the Node Name is. Next is the LAN host name, indicating what it is, it is not clickable. Moving on to the service name, which shows what services the node offers, in this case the meshchat app is there ready to be used. Meshchat is a text application to send text over the mesh.
The next line has the following headings on it:
| Current Neighbors | LAN Hostname | LQ | NLQ | SNR | Quality | TxMbps | Distance | Service Name |
Current Neighbours are those that this node is connected to.
LAN Hostname is that of any services offered by the node/
LQ is Link Quality, this is the quality of the link inbound
NLQ is Neighbour Link quality, or how the neighbour sees the link.
SNR is Signal to Noise Ratio (for RF links)
Quality of link
TxMbs is transmit Megabites per second or the data rate of this link.
Distance is calculated from the lat/longs of the nodes and the round trip times.
Service Name is the name tag that may actually be clicked on to take you to that service IF NOT IN BLACK. NOTE, we had a firmware update the following screens have a bit more information.
On the next line we see the following:
KI5VMF-OKLAHOMA (wg,active) 100% 100% 100%
This is a tunnel so it does not show SNR and it does not have lat/long information as it is used mobile but the 100% values are LQ (how nodes receives) NLQ how neighbor receives and total quality.
Here is a snapshot of another node (link to OKC N DMR Repeater)

In this one you can see all of the columns in use and the data they show. Note the SNR, Quality, TxMbits, and distance. That is just shy of the max speed of the device, so even with a quality of 84% we still have and excellent link. Remember that many people do not get much more than 100 Mbps from their ISP.
Under Service name you can see MeshChat, a neighbour device host MeshChat-OK, a text app, it also host iperfspeed a speed test for data links, there is a camera also hosted by that device and the solar power dashboard is also viewable from that device.
If you have these URL’s saved in the browser you use to browse the mesh you can reach them without having to search out the URL in the Mesh Status screen.
Here is the lower and usually longer part of the Mesh Status screen, remote nodes:

These are the nodes which are more than a hop distant from the node you are viewing. ETX is a value of weighting based on Round Trip Time (RTT) to each device on the mesh. The rest of the values are the same as the previous sections.
There are more parts to the node screens for administration but right now lets just look over this and get familiar with it. Part 3 will deal with those sections of the node.
Chuck, KP4DJT


